Setting up Microk8s


MicroK8s is a lightweight Kubernetes distribution developed by Canonical, the company behind Ubuntu. It's designed for easy deployment and testing on a single machine or small clusters. MicroK8s provides a quick way to set up a Kubernetes environment for development, testing, or learning purposes without the complexities of setting up a full-scale cluster. It's often used for local development, CI/CD pipelines, and edge computing scenarios.
MicroK8s can be installed on a t4g.small instance which is free.
Create a free tier account with AWS https://aws.amazon.com/free/
pre-requisite: email id, credit card [ 2rs - refunded ]
create a new VM in AWS with the following specifications:
Location: default(N Virginia)
vm name: MicroK8s
OS Image: Ubuntu Server 20.04 arm
instance type: t4g.small
arm - this is a free instance in AWS
key pair - create a new key pair(.pem) with the name k8s
Network settings -> edit VPC -> select default VPC Security group -> create a new SG -> sg_k8s Inbound SG rule, replace the rule allowing SSH from anywhere with All traffic from anywhere
Storage - 30GB
launch instance

Install MicroK8s
MicroK8s will install a minimal, lightweight Kubernetes you can run and use on practically any machine. It can be installed with a snap:
$ sudo -i
# hostnamectl hostname microkube
# snap install microk8s --classic --channel=1.29
# exit

Join the group
MicroK8s creates a group to enable seamless usage of commands which require admin privilege. To add your current user to the group and gain access to the .kube caching directory, run the following three commands:
$ sudo usermod -a -G microk8s ubuntu$ mkdir -p ~/.kube
$ chown -f -R $USER ~/.kube
You will also need to re-enter the session for the group update to take place:
$ sudo su - $USER

Check the status
MicroK8s has a built-in command to display its status. During installation you can use the --wait-ready flag to wait for the Kubernetes services to initialize:
$ microk8s status --wait-ready

Access Kubernetes
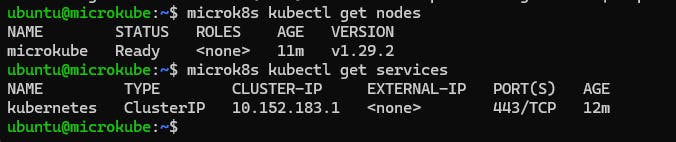
MicroK8s bundles its own version of kubectl for accessing Kubernetes. Use it to run commands to monitor and control your Kubernetes. For example, to view your node:
# microk8s kubectl get nodes
…or to see the running services:
# microk8s kubectl get services
MicroK8s uses a namespaced kubectl command to prevent conflicts with any existing installs of kubectl. If you don’t have an existing install, it is easier to add an alias (append to ~/.bash_aliases) like this: alias kubectl='microk8s kubectl'

